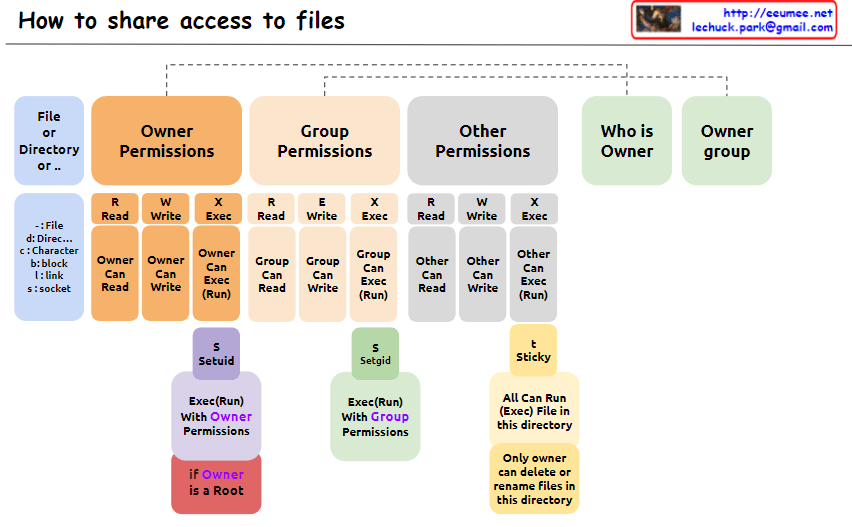
From Claude with some prompting
Find Subarrays with Same Remainder First, we calculate the prefix sum, which is the cumulative sum up to each element in the array. For example, the prefix sum for [4, 5, 0, -2, -3, 1] is [4, 9, 9, 7, 4, 5]. Then, we find the remainder when each prefix sum is divided by k. In this case, with k=5, the remainders are [4, 4, 4, 2, 4, 0].
Count Subarrays with Same Remainder We count the number of subarrays that have the same remainder. For instance, if the remainder 4 appears 3 times, it means there are 3 subarrays ending with a sum divisible by 5 and leaving a remainder of 4. We store these counts in a remainder_count array.
Calculate Answer For the remainder 0, we assume there is always at least one subarray (the empty subarray), so we initialize remainder_count[0] = 1. Then, we calculate the combinations of subarrays with the same remainder. If there are remainder_count[r] subarrays with the same remainder r, the number of combinations is (remainder_count[r] * (remainder_count[r] – 1)) / 2. We sum up these values for all remainders to get the final answer.
In summary, this algorithm utilizes the remainders of prefix sums to count the number of subarrays with the same remainder, and then combines these counts to find the total number of subarrays whose sum is divisible by k.